14th March 2025 - 10 min read
How to Add Subtitles on CapCut
Subtitles are one of the most powerful tools you can use to improve the reach, accessibility, and engagement of your videos. Whether you’re creating content for TikTok, Instagram Reels, YouTube Shorts, or long-form videos, adding well-timed, visually appealing subtitles can make a huge difference in how your content is perceived and consumed.

Why Are Subtitles Important?
- Boost Engagement: Many users scroll through social media with their sound off, meaning they’ll skip a video if they can’t understand it. Subtitles keep viewers watching longer
- Increase Accessibility: Adding subtitles ensures that hearing-impaired audiences can engage with your content
- Enhance Clarity: If you have an accent or background noise, subtitles help make sure your message is understood clearly
- Improve Brand Identity: Creators who use custom, dynamic subtitles make their videos stand out and look more professional.
Now, let’s dive into how to add subtitles using CapCut!
How to Add Subtitles in CapCut
1. Automatically Generate Subtitles with CapCut (Best for fast editing)
CapCut has an Auto Captions feature that generates subtitles automatically from your audio.
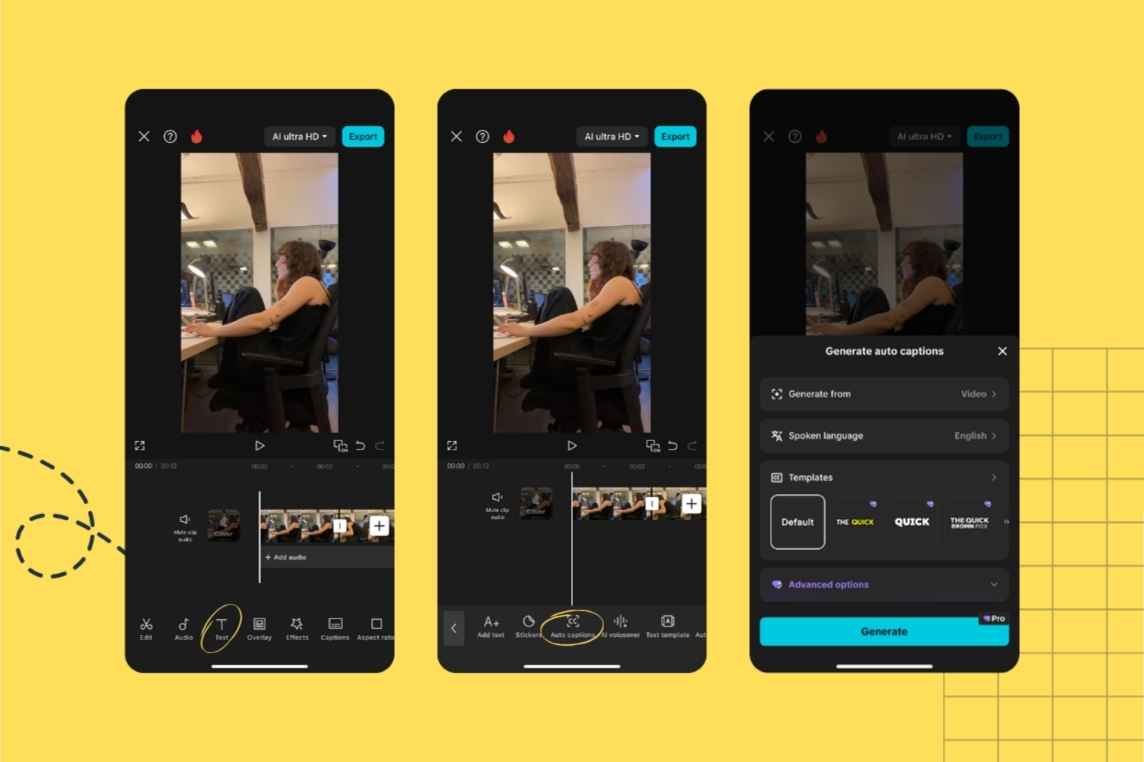
Steps to generate Auto-Captions:
- Open your video in CapCut
- Tap on “Text” in the bottom menu
- Select “Auto Captions” and choose your language
- Tap “Generate”, and CapCut will automatically transcribe your video
- Once generated, you can edit, move, and style your subtitles
✅ Pros: Quick, easy and works for most clear audio
❌ Cons: May have errors, especially with background noise or accents, so review and manual corrections are needed
2. Manually Add Subtitles in CapCut (Best for perfect accuracy)
If you want complete control over your subtitles, you can add them manually.
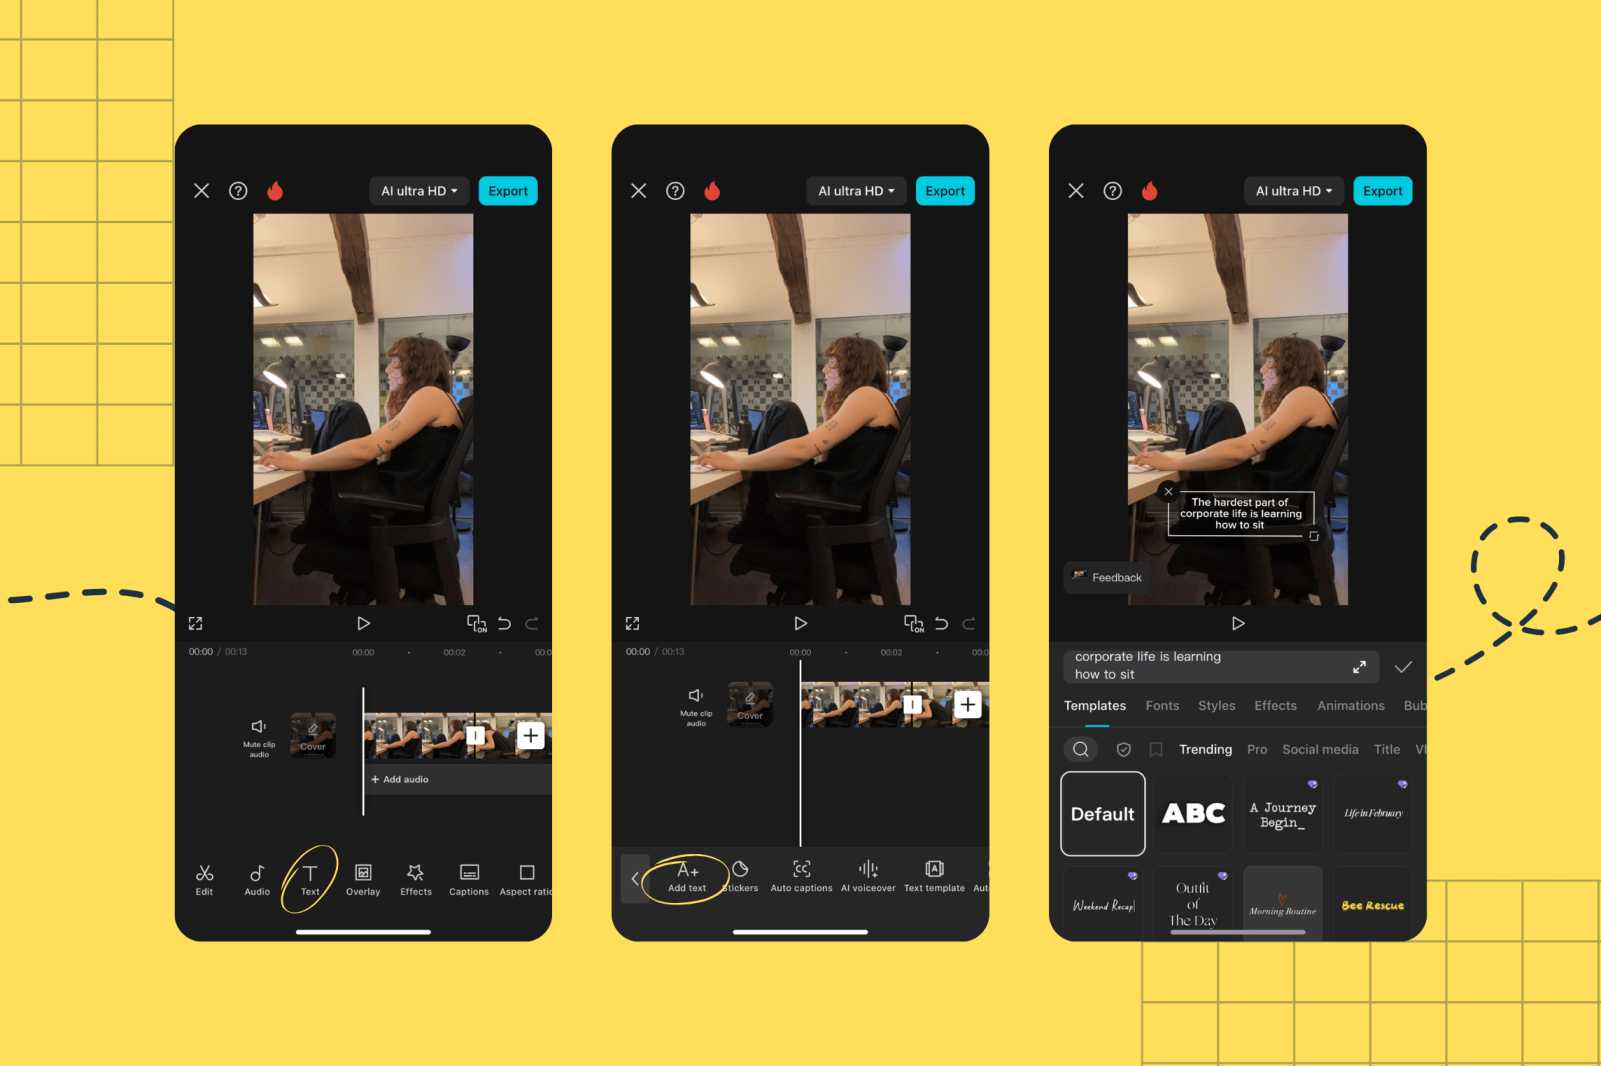
Steps to add subtitles manually:
- Tap on “Text” and select “Add Text”
- Type your subtitle and adjust the font, size, and placement
- Drag the text layer in the timeline to match the exact timing of your audio
- Repeat for each segment of dialogue
✅ Pros: Most accurate way to subtitle videos
❌ Cons: Takes more time compared to auto-captioning
How to Make Your Subtitles More Dynamic & Aesthetic
Instead of plain text, dynamic subtitles make your videos visually engaging and help emphasize key words.
1. Use Animated Text Effects
CapCut allows you to animate your subtitles, making them appear word by word or letter by letter for a more cinematic effect.
How to add animation to subtitles:
- Select your subtitle text
- Tap “Animation” and choose from options like Typewriter, Fade, Bounce, or Zoom
- Adjust the speed for a natural look
2. Highlight Keywords for Emphasis
Creators like Alex Hormozi and big-name influencers bold key words in their subtitles to make them more engaging.
How to highlight key words:
- Add a new text layer just for the important words
- Change the font, color, or size to make them stand out
- Sync them to appear at the right moment in the video
3. Customize Fonts & Colors for Branding
Using custom fonts and colors makes your subtitles recognizable and unique.
Best fonts for subtitles:
- Montserrat Bold – Clean and professional
- Poppins Medium – Smooth and modern
- Anton – Great for bold emphasis
- Handwritten Fonts (for casual, storytelling content)
Best colors for subtitles:
- White text with a black outline for visibility
- Yellow or bright colors for emphasis
- Brand colors to match your content aesthetic
Best Subtitle Placement & Size for a 16:9 Video
If you’re editing a 16:9 landscape video (for YouTube or Facebook), placing subtitles correctly is crucial to avoid overlap with UI elements.
Ideal subtitle size & placement for 16:9 videos:
- Font size: 45-55 px (large enough to read on mobile & desktop)
- Line height: 100-120% for better readability
- Alignment: centered or bottom-center, but not too low!
Final Tips for Adding Subtitles Like a Pro
🔹 Keep subtitles short & snappy – Avoid long blocks of text
🔹 Match subtitle timing precisely – Bad timing can ruin the experience!
🔹 Respect the Safe Zone – Make sure your subtitles stay within the safe zone to avoid being covered by platform UI elements like buttons and captions
Adding high-quality, well-placed subtitles to your videos can increase engagement, accessibility, and professionalism—helping you reach a larger audience and boost your content’s performance!
.jpg)


.png)


.png)

.png)